


Airy, modern, impeccable spaces abound on HGTV, Pinterest, and social media influencer accounts. They look, well, dreamy. Like a dream most of us couldn’t afford. But I’m going to let you in on a little secret: You can make a huge design impact on your house without breaking the bank. Here are my top inexpensive home design hacks that will look like you spent a million bucks:
1. Paint (the obvious first step)
A gallon of good quality paint will set you back about $35-50 bucks. And it’s worth every penny. Paint can be used not only to change the color of your walls, but also cabinets, floors, window frames, ceiling fans, fireplace surrounds, bookshelves, tile, bricks, and, well, anything else you can imagine!
The first thing to decide is what color to use. White and lighter colors will obviously help brighten up a space, but dark tones can be dramatic. Little peeks of color in unexpected places can also scream high-design when applied with restraint and purpose. Here is a valuable resource for selecting a paint color.
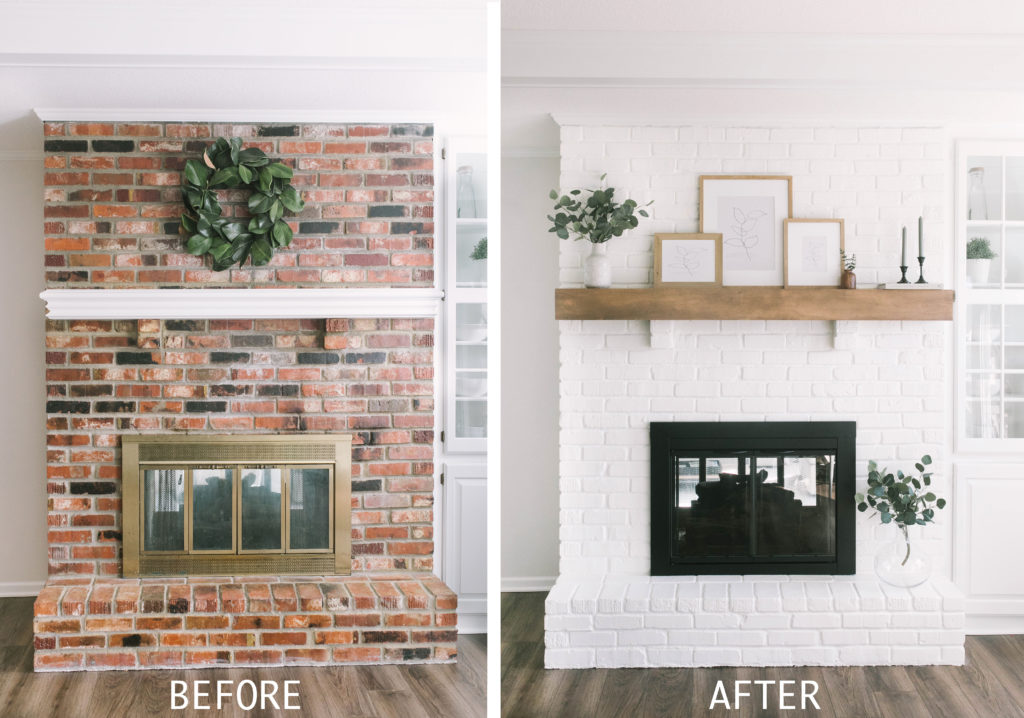
Fireplace surrounds
Instead of having to replace a dated brass fireplace surround, try painting it black. You will need special paint that is high-heat resistant, such as this Rustoleum product. The end result makes the surround appear larger, sleeker, and more modern.

If your brick or stone fireplace surround is reading too dated and not modern enough for your taste, try painting it a fresh color (bright white, bold deep jewel tone, or even charcoal or black) for a new life. Pairing a mirror or bright artwork will also help the fireplace wall feel bigger by reflecting light around the room.
Cabinets
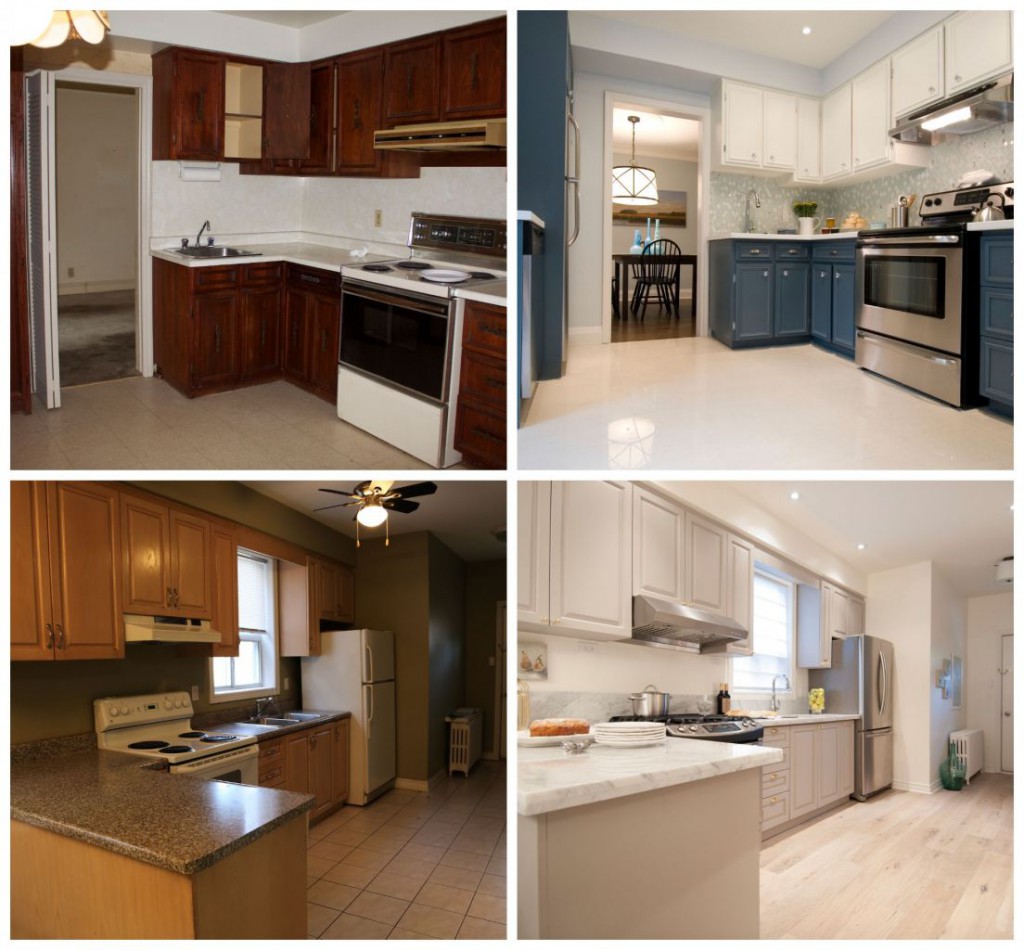
Yearning for a new kitchen, but a remodel isn’t in the budget? Try painting the existing cabinets and maybe install new flooring or a new backsplash to bring it to life. (Also swap out the bulbs for cool white to bring more light into a dim space!). Select a very durable paint made specifically made for cabinets to avoid the headache of chipping paint and never ending touch-ups.
Tile
Painting over glazed tile is a little tricker, as there isn’t a great surface for the paint to adhere unless you etch it. Here is more detailed information about the process of etching. Once the surface has been properly prepared, let your imagination take you away! You could paint old 50’s style brown tile a fresh white, repaint your entryway using a stencil, etc. Be sure to seal this paint well to prevent flaking.

2. Swap your lightbulbs
It’s not always possible to have sun-drenched spaces, however you can fake it with something as inexpensive as lightbulbs. Commonly, bulbs are warm white (3000K temperature) but there are actually a range of “colors” (temperatures) available. The temperature of the bulb can draw out warmer or cooler tones in your house and even impact the color your paint and furniture appears. It can even mimic the brightness of the sun and provide the illusion of more natural light, even when natural light is scarce.
I prefer cool white (4000K) bulbs in most spaces in my home, particularly in the kitchen and living spaces where more light is necessary. In our bedrooms, I like the softer glow of warm white (3000K) bulbs. For the best fit for you, experiment with different temperature bulbs. You will be amazed at what a difference a change in light temperature can make to a room!
Opt for light emitting diode (LED) bulbs for maximum lifespan. And, BONUS!, LED bulbs use less wattage to produce light as their incandescent counterparts, and don’t waste much energy to heat.

3. Hang a Curtain
Another great hack for designing your space inexpensively is by hanging curtains. Curtains can introduce color, texture, & pattern, increase energy efficiency, hide ugly but functional blinds, and even make your space look bigger. That’s a pretty good bang for your buck!
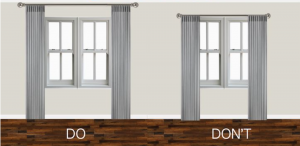
Curtain rods should be hung close to the ceiling and extend 3-6″ on either side of the window frame (see image below). By doing this, it will help draw your eye up and give the illusion of more height, as well as make the window appear wider and more open than it actually is. Who doesn’t love the look of taller windows (especially when it’s basically free)?!
The curtain panels themselves should extend all the way from ceiling to floor. Some people prefer their curtains hang just slightly above the floor while others like the look of a “flooded” drape. I personally think the flooded look is more formal & traditional, so would be best suited to a formal living space. Curtains slightly off the ground are generally easier to clean as they don’t collect floor dust and give a cleaner, more modern appearance.
Another high style yet inexpensive element you can add to your curtain rods are finials. Finials are decorative end pieces that attach onto the ends of the rod. Choose from wood, metal (in a variety of finishes), glass, painted ceramic, even marble to match the rest of your decor. Simply unscrew the existing endplate and add the finial of your choice – viola! High-end design on the low-end budget.
4. Rugs
Can’t change the floor under your feet? “Hide” it with a rug! And yes, you can layer rugs over carpet or even over other rugs! This is an especially great option if you are renting and unable to change the carpet, even if you wanted to. I think a layered look provides some nice texture and a lux feel. There are a wide range of rugs, in every way possible – material, price points, patterns, etc.
For me, I choose a rug based on the traffic & activity that room will have. For example, I chose an indoor/outdoor rug for our den (first floor TV/playroom) after replacing both a white rug that became irreparably dingy after two short years and a cotton rug that met it’s unfortunate demise with a bout of throw up from my son.
In general, a rug made of polypropylene, wool, or nylon will be the most durable option. Do not chose jute unless you like walking on the texture of a bundle of sticks and pokey hairs. Just sayin’. You can always make a thin rug feel more plush with a thick carpet mat underneath. Rugs with zero or low pile will be the easiest to maintain and result in longer lifespans for areas with a lot of foot traffic than those with high pile.
Whatever type of rug you choose, get one that is appropriately sized to your space. Bigger isn’t always better, as a rug that is too big will actually make your space (and furniture) feel dwarfed, whereas a rug that is too small will make your space also feel small and cramped. To help find the perfect Goldilocks size for an area rug, follow these guidelines.
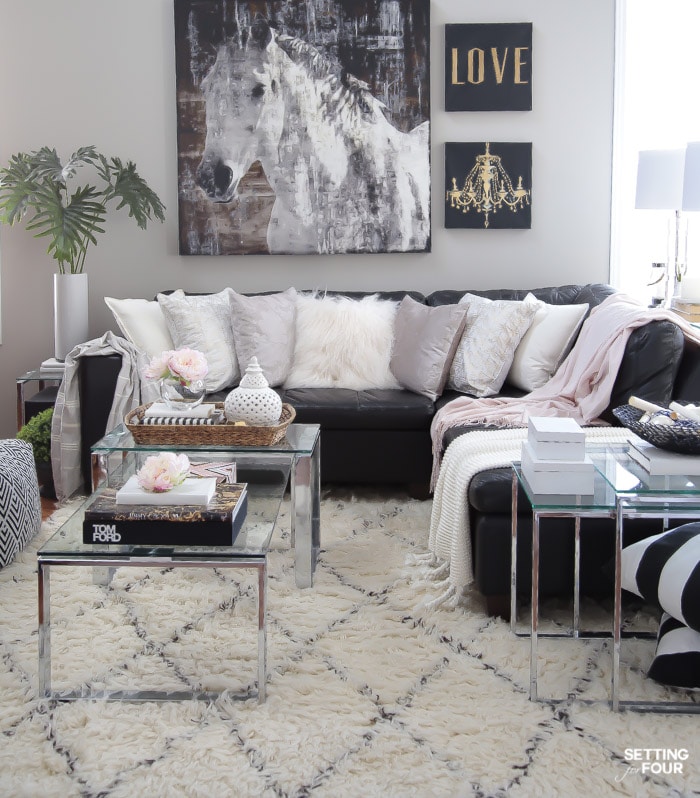
5. Large Scale Art
One of my biggest pet peeves is artwork that isn’t appropriately scaled for the space it’s displayed. This diminishes both the impact of the art piece itself and your space – neither of which was the intention of hanging the piece to begin with. So, choose one big piece to make a bold statement and/or thoughtfully curate a bigger gallery type wall.
I would venture a guess that anything 8×10″ or smaller is just too small on its own to make an impact on your walls. Instead, select one large scale piece that is a minimum of 24″ x 36″ or larger to make your space look impressive. Order a poster print of your favorite fine art piece or consider having your most recent family photo printed in black & white on a poster. I have used pictures from travels printed on canvases, too. Buy an old, framed painting from a garage sale and paint over the canvas.
This blog has great tips for creating large scale art affordably.
6. Declutter
Coco Chanel famously said, “Before you leave the house, look in the mirror and remove one accessory.” I think the same is true for home design. Too many furniture pieces, storage units, or accents take away from the impact of a design. Pick a few things to focus the room and let them speak for themselves.
Decluttering can mean anything from organizing the space to better accommodate the things you do have to purging items. Yes, even furniture pieces – looking at you, oversized recliner chair. Put things away, out of sight, for cleaner lines. A solid Marie Kondo style purge feels so good, makes a huge impact on the visual space, and costs $0.00 to do. In fact, you can even sell the stuff you get rid of and earn some extra cash. Plus you’re saving those items from a landfill somewhere. Win-win!

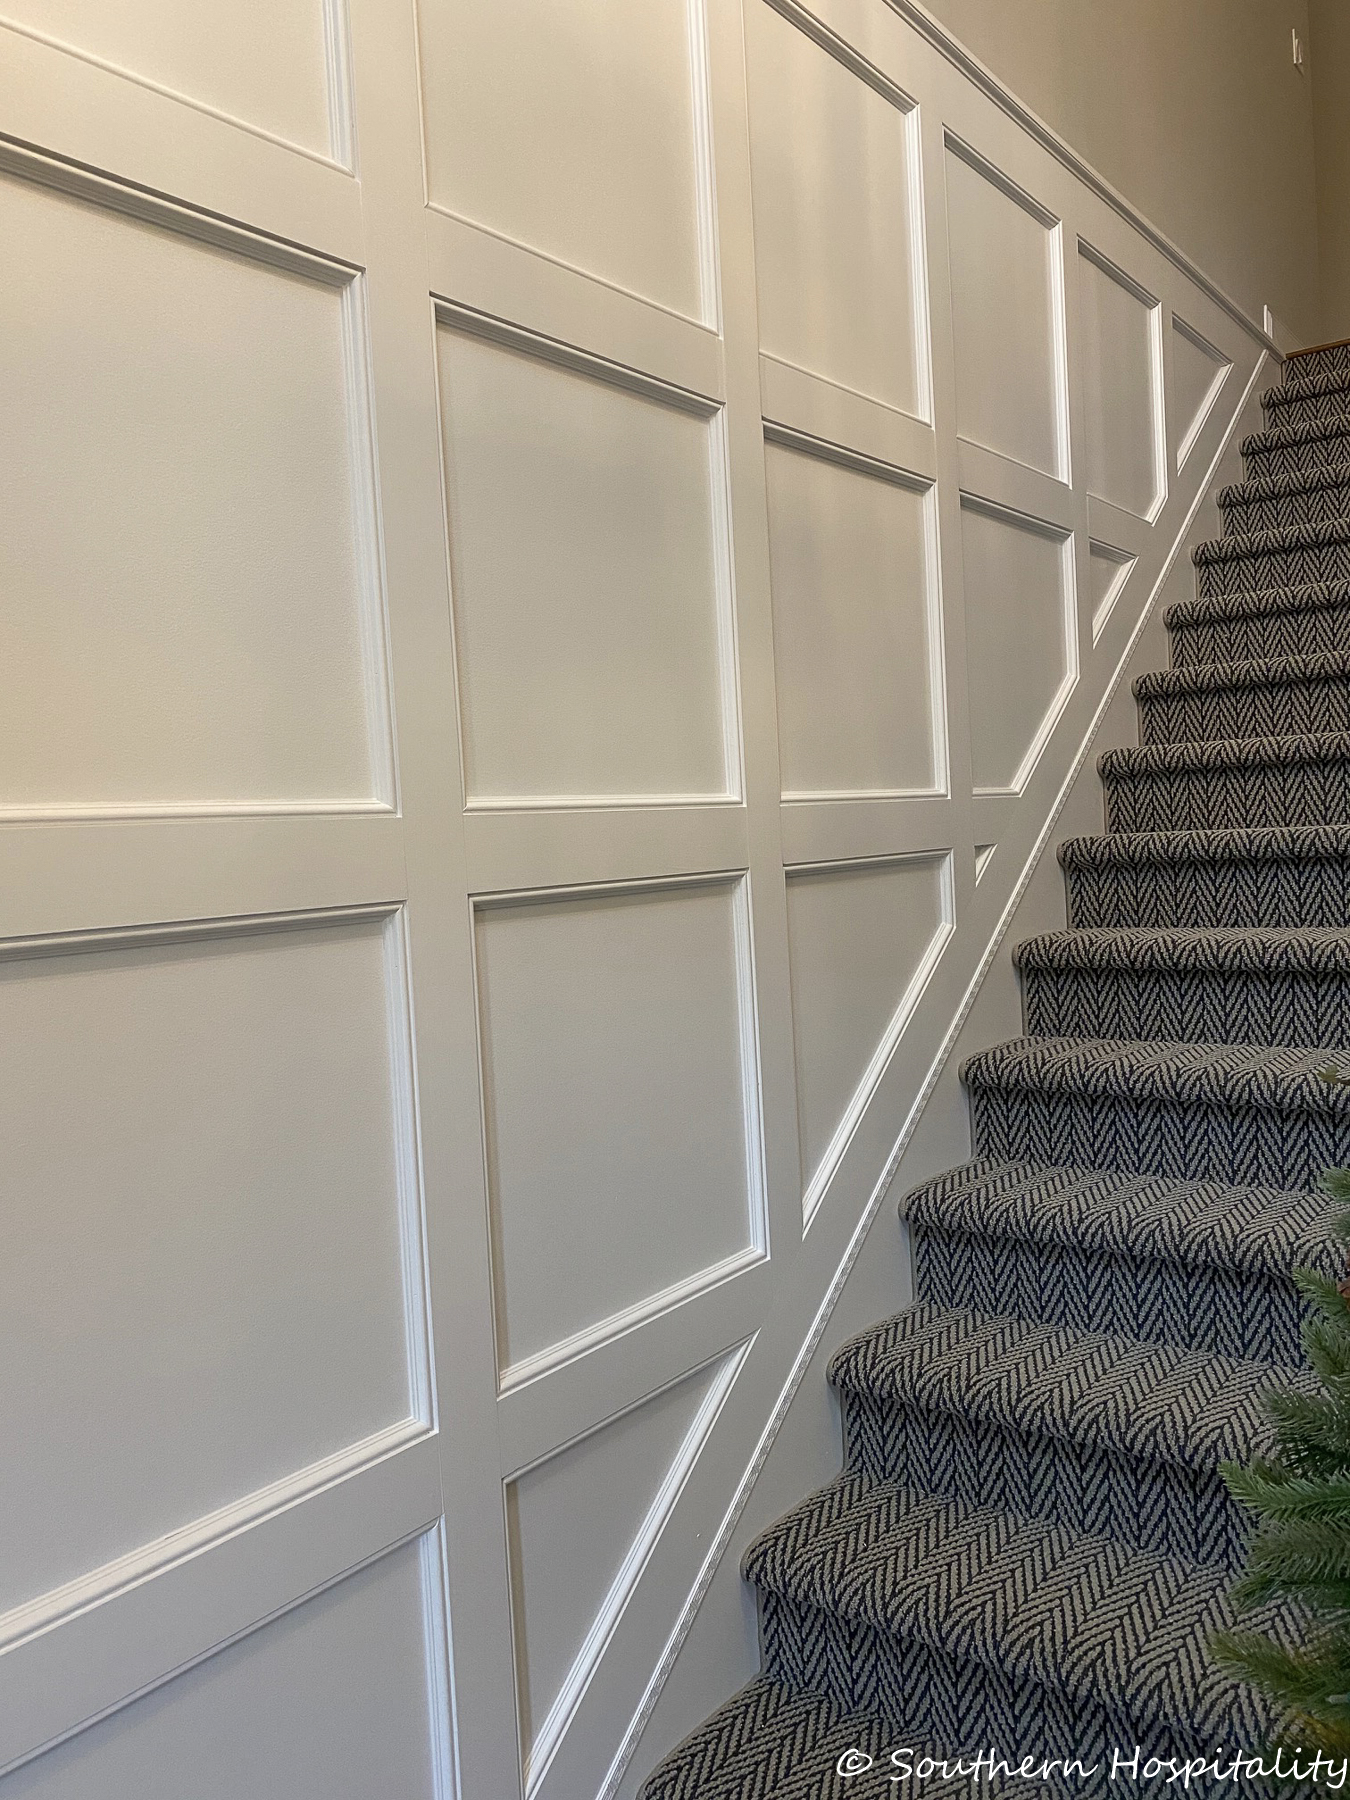
7. Add Architectural Details
They just don’t build them like they used to. (insert wistful sigh here). But, just because they didn’t build a lot of character into your house doesn’t mean you can’t *add* that character yourself.
One of the most classic architectural details that I swoon over is millwork – I.e., fancy wood working and moldings. This can, of course, cost a fortune. However, you can get a millwork dupe on the cheap by gluing or nailing these premade box-style moldings onto a wall to create your own wainscoting or paneling. Simply paint them the same color as the wall and you’ve got almost instant high design charm with no mitre saw required.

In reflection…
No matter what your house looks like, it is your home. At the end of the day, your home reflects your personal style and comfort. However, I hope these tips helped demonstrated that high design doesn’t need a high price tag to match.
